Invalid Domain
You are here :
Configuring POPstar to download mail from OrpheusPOPstar is a free mail transfer agent, which can be downloaded from www.heenan.me.uk/acorn/download.html [v2.05] or a slightly newer version from www.youmustbejoking.demon.co.uk/progs.apps.html [v2.06] These instructions assume that you are using version 2.05 or later. 1. After downloading the archive file, open it and drag !POPstar to somewhere convenient on your hard drive. 2. Before you can run !POPstar for the first time, you need to install the SockWatch module and create some default choices (containing your email and server details). Double-click on the !ModInst application inside the archive. This will install the relevant module. Creating your choices file
POPstar does not automatically create and/or install a choices folder, so this can sometimes lead to confusion when running for the first time, possibly leading to a "Users file is missing or unreadable" error. 3. Firstly you should create a POPstar directory within your Choices directory. To do this, press CTRL-f12 to open a new task window. Now type *Filer_OpenDir <choices$write> and press return. The main choices directory should now be opened, displaying a number of directories from other applications installed on your computer. 4. Create a new directory called POPstar and then double-click on it to open it. 5. Copy the default Choices and Users files from the original archive that you downloaded, into this new POPstar directory. 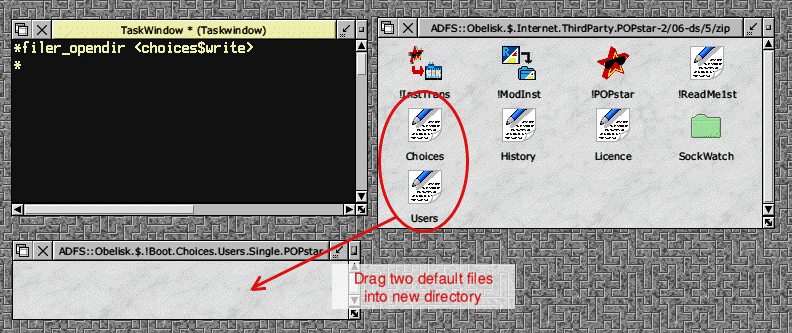 Install the default POPstar choices inside the Choices directory (click on image to view full size) Description of the two files
The Choices file contains information such as the SMTP (outgoing) mail server and various 'POPstar' choices, such as the time of auto-fetches, size of messages and whether to display an iconbar icon etc. The Users file contains personal mailbox information such as your POP3 username, password and server name. You need to manually edit (using your favourite text editor) these two files in order to send and receive emails via Orpheus. Setting up the 'Choices' file
The only thing which must be defined in the 'Choices' file is the outgoing SMTP server. For Orpheus, this is smtp.orpheusnet.co.uk and should be entered on the line beginning SMTP: (see fig.2). 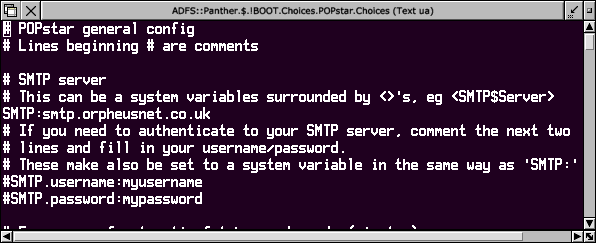 Fig.2 - Set the SMTP server to smtp.orpheusnet.co.uk You can leave everything else left as the default values (although if you're feeling confident you may like to examine the rest of the file to see what options are available - descriptive comments are in the file, beginning with #) Save the file. You can download a Choices file already preset with the Orpheus server details here if you like. Setting up the 'Users' file
The 'Users' file consists mailing of comment lines (line starting with a # character) which provide detailed instrictions on the format with which to enter your data. Scroll to the last line in the file and enter 8 columns separated by TAB characters. The Local user should be something like your Christian name (in the example here, Paul). It doesn't really matter what as this is stored locally and independent of server or ISP settings. The Remote user should be set to your Orpheus POP3 user ID. This will be something in the order of ab15 (two or three letters followed by two or three numbers). This is provided on the paperwork which came with your account details. The Password should be set to your Orpheus POP3 password. Again, this is provided on the paperwork which came with your account details. The Server should be set to the incoming POP 3 servername. This is pop.orpheusnet.co.uk The following four columns consist of Y (for Yes) or N (for No) to set various 'flags. Unless you know what you're doing, or have read and understood the documentation in the file, it's best to leave these to the default settings (Y Y N N). When you've entered all the relevant data, the end of your file will look something like that shown in fig.3 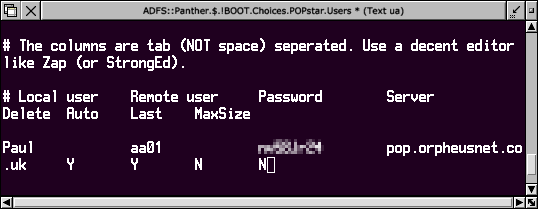 Fig.3 - Setting the user information Once you've set all your user information you should save the file. POPstar should now be setup ready to use with Orpheus. Double-click on !POPstar to load and check your emails for the first time. Once POPstar is loaded onto the iconbar, clicking ADJUST on the iconbar icon will initiate a mail transfer and download/send any waiting mail for you. You should now use your regular email client in order to actually display and read your email messages. |