Invalid Domain
You are here :
Configuring RComp's DialUp (version 1) to connect to Orpheus 56K dialupDialup is developed by RComp and these instructions are written using DialUp Lite which is provided free with the Iyonix computer. You may like to consider upgrading to DialUp 3 but these instructions should be broadly similar irrespective of which version of DialUp you're using.Firstly you should download a provider file for Orpheus. We provide a suitable one here. When you've downloaded it, save it somewhere safe on your hard disc and then set the filetype to Dialup (aac). If you're unsure about setting filetypes, click MENU over the file icon on your hard disc, then select File 'orpheus' -> Set type -> and enter aac then press return. Step 1 Drag and drop the orpheus provider file on the DialUp iconbar icon. DialUp should detect this and open the window shown below. Step 2 Step 3 Step 4 Step 5 Your account should now be created and you should be able to use !DialUp to go online with your new Orpheus account. Additional Support
|
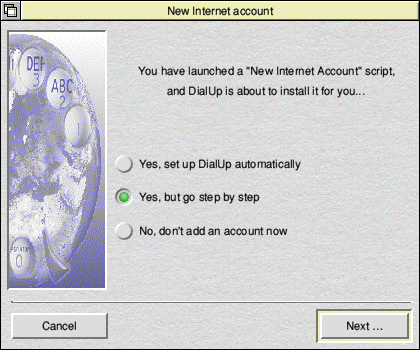
 Click on the 'Yes, but go step by step' option so that we can ensure all our settings are correct and click Next...
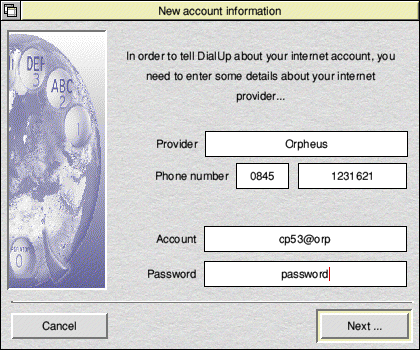
 Check the details and enter your Account name and Password as supplied to you with your account details. Click Next...
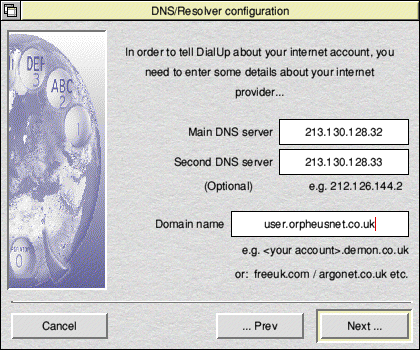
 Check the DNS settings and enter a domain name in the format shown in the screenshot. The domain name would normally be your username or machine name .orpheusnet.co.uk. If unsure, just enter orpheusnet.co.uk. Click Next...
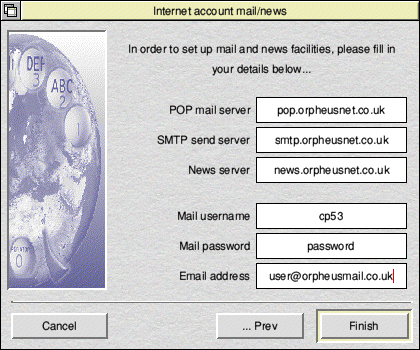
 The next screen shows the various mail settings. The servers should be setup automatically for you, along with your username and password. Double-check that your Mail username and Mail password are correct and enter your Email address. This will normally be in the form username@orpheusmail.co.uk unless you've opted for one of our alternative email domains.